Initial Start-Up with TSE
When the register is used for the first time, you have to make a few configurations. The setup assistant will guide you through the individual steps and will start automatically after you switch on your cash register for the first time.
Preparation
Company data (company name, address, tax number) is required for start-up. It is advantageous to have this ready at the start.
Security module: TSE
The TSE is used exclusively for cash registers in Germany and is supplied by primasello ready for use with the device. You can find out how to start using your primasello cash register for Austria in the chapter Initial Start-Up with RKSV.
Welcome
When the primasello cash register is switched on, the welcome screen appears after the system has booted up. In the upper right corner of this screen you will find the orange ‘Help’ button, which you can use to call up the quick help guide. This contains information and assistance on the individual steps involved in starting up the system.
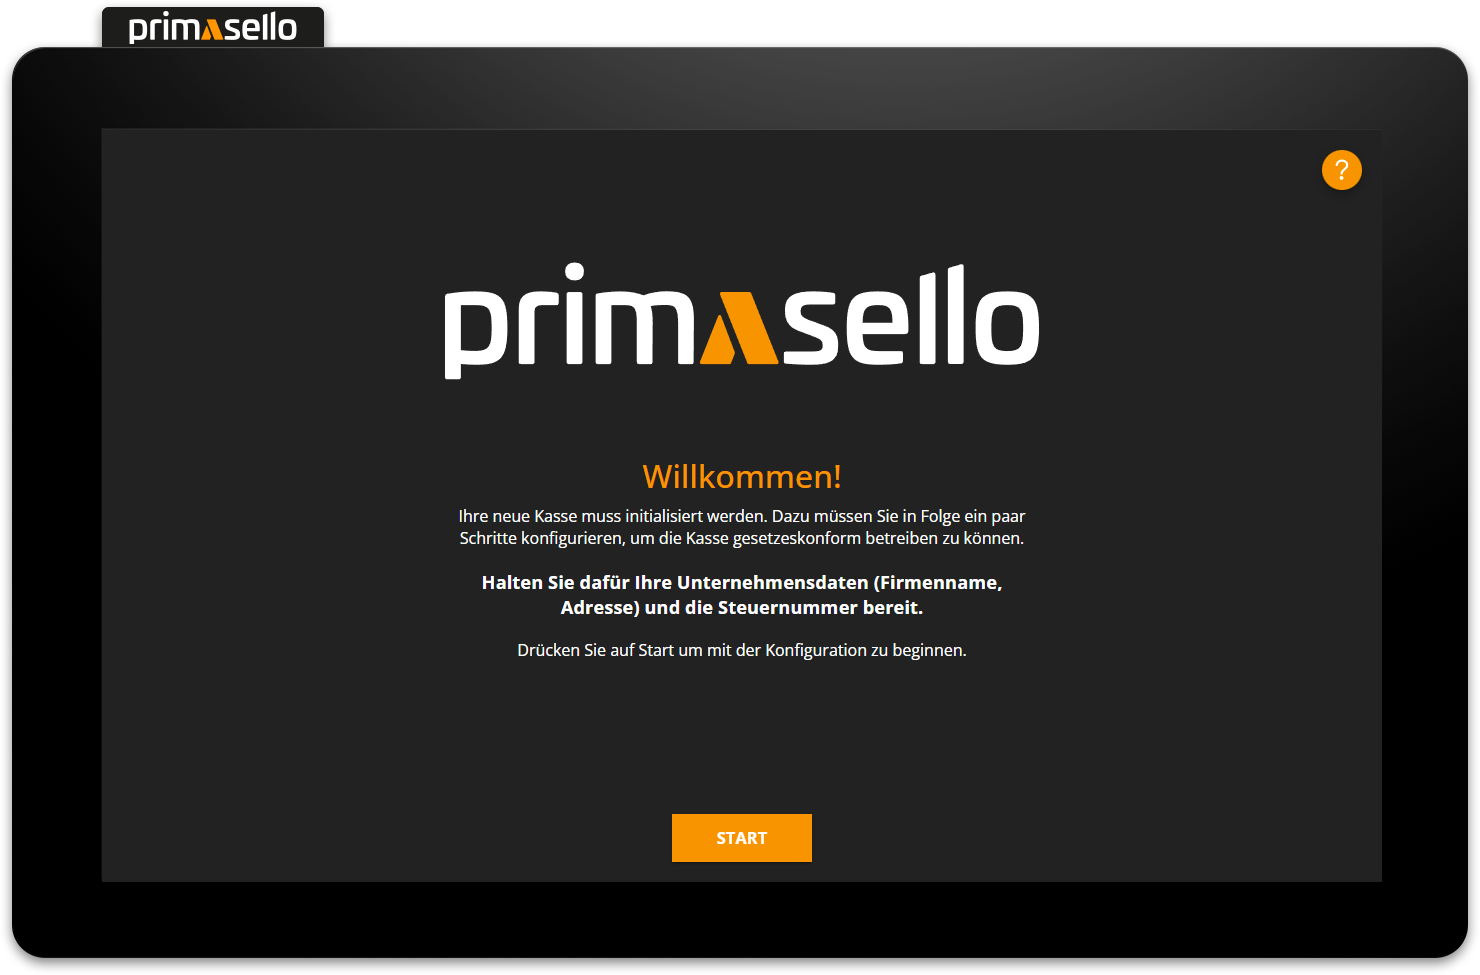
To start configuring the register, press the orange ‘Start’ button at the bottom.
Projects
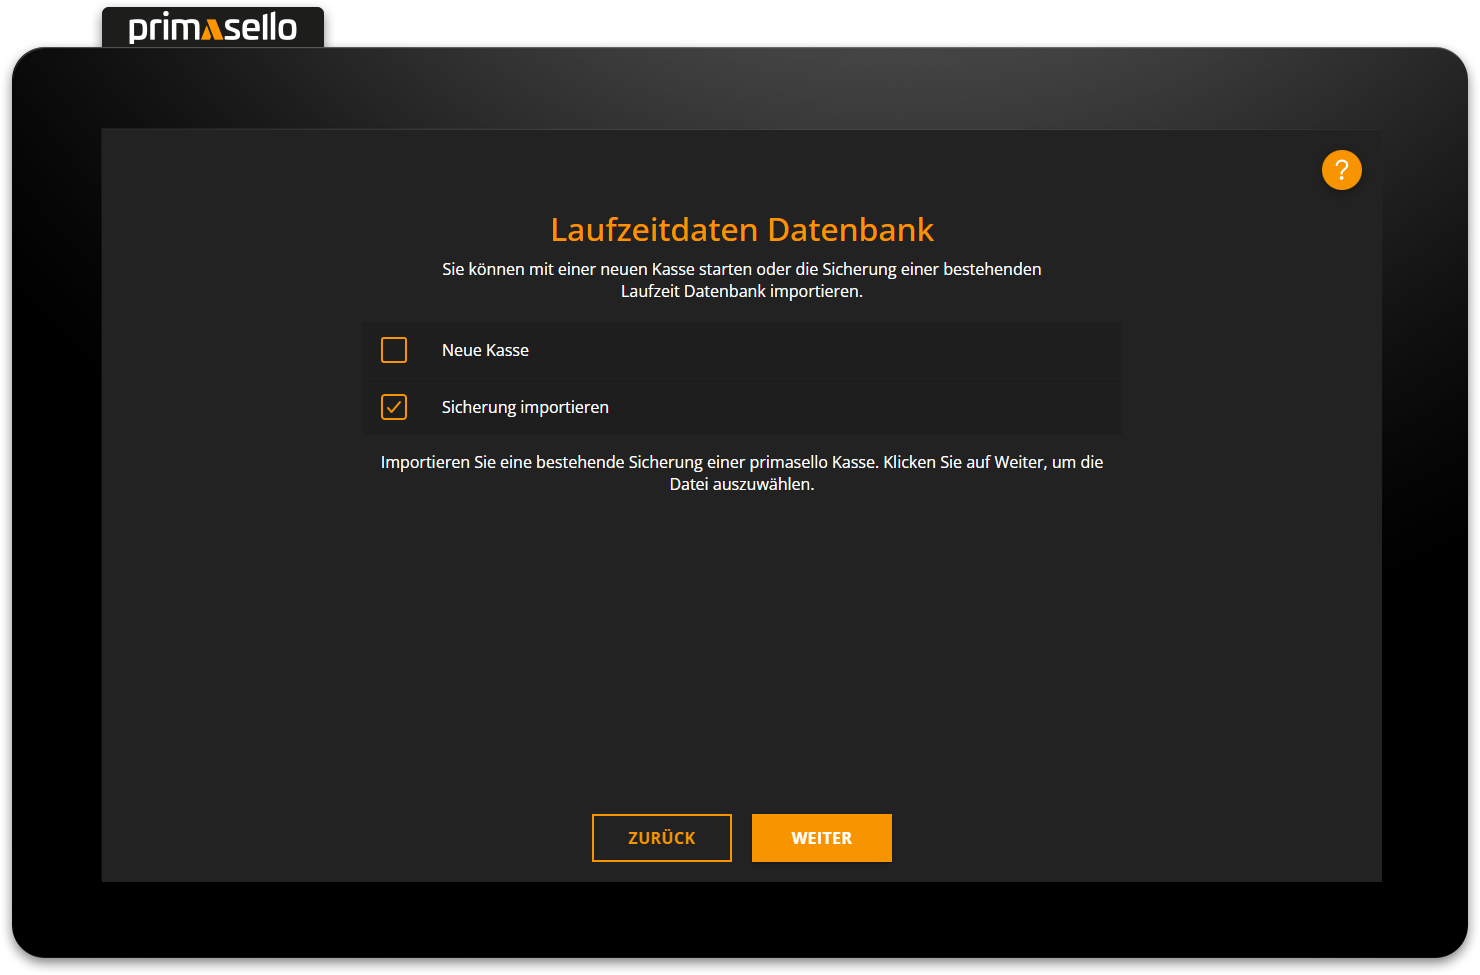
The project stores all programming and configurations of the register. This includes adjustments to the register interface, products, tax classes, payment methods and users. When starting up, there are two options available for a new project, which are described in more detail below. Press the desired setting to proceed to the next step of the start-up process. The master data in the project can be adjusted at any time after start-up. Backups can also be created and used for new start-ups.
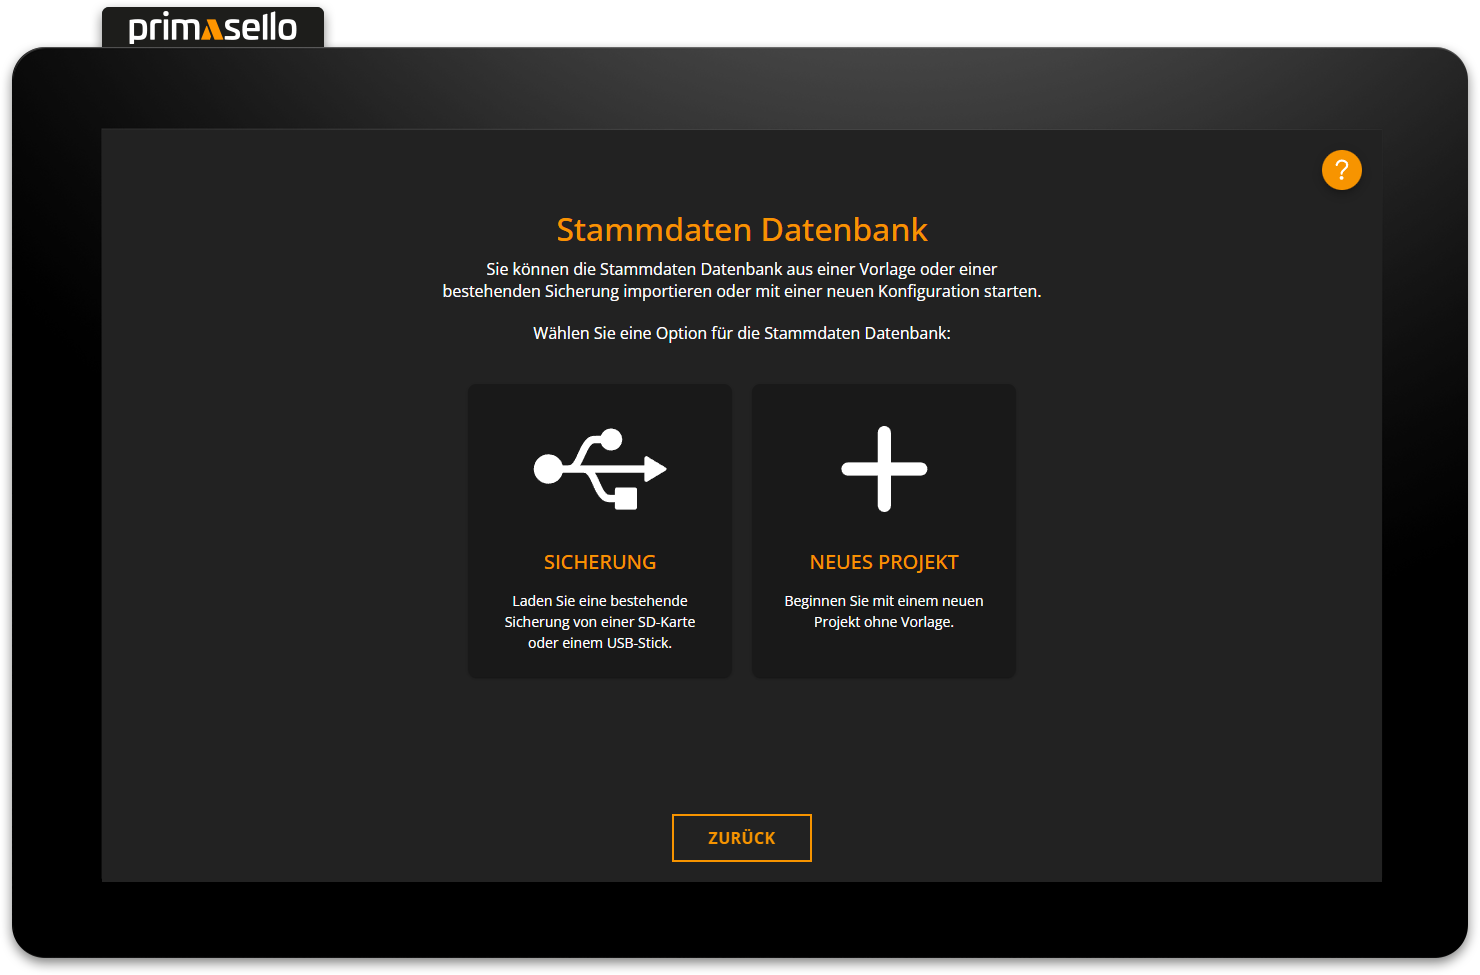
Backup
If a configuration of the master data has already been created and is to be transferred to the new primasello cash register, the backup of an existing project can be uploaded. Uploading backups is mainly used when setting up another register in the same company. This means that not all master data has to be recreated, but can simply be ‘copied’ from one register to the next. As a result, the same products and users are available on the new register and the register interface contains the same functions as the register from which the backup was made.
Load data from USB stick
How to load data from an external storage medium is described in the chapter Loading Data from a USB Stick.
New project
To start with a new register without a template and to make the complete configuration by yourself, you can select ‘New Project’. This creates a new database that only contains the most important functions (shopping cart, numeric keyboard, demo products, standard payment methods, etc.) on the register interface and only the standard entries (relevant tax rates, standard users, etc.) are created in the master data.
Database and programming
More information on editing master data is provided in the section on Programming. What happens to the databases during operation is described in the chapter Databases.
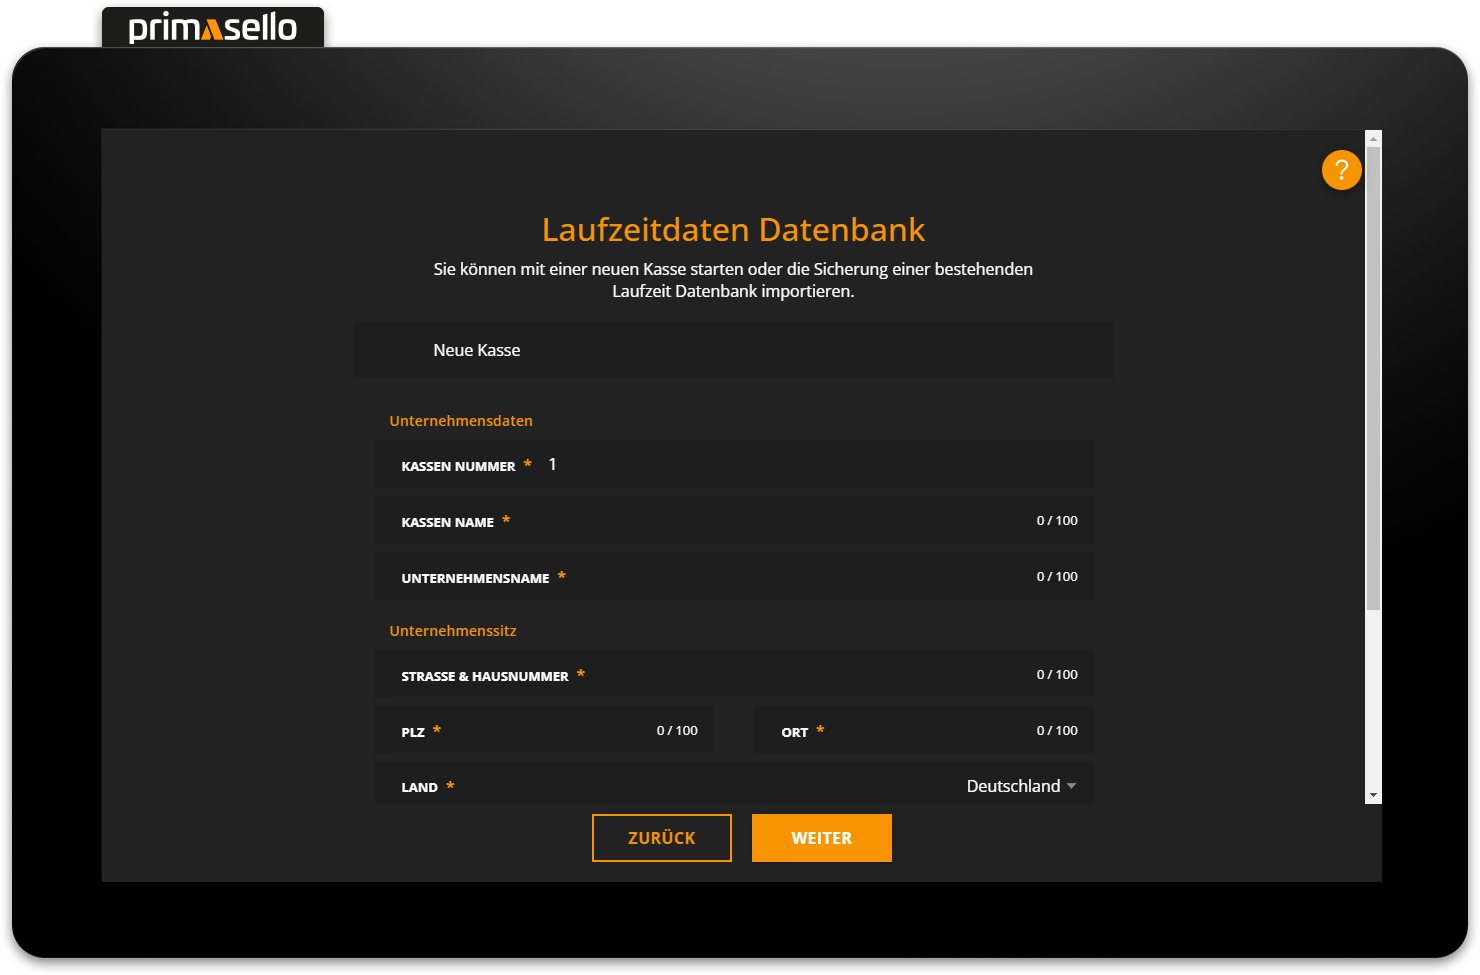
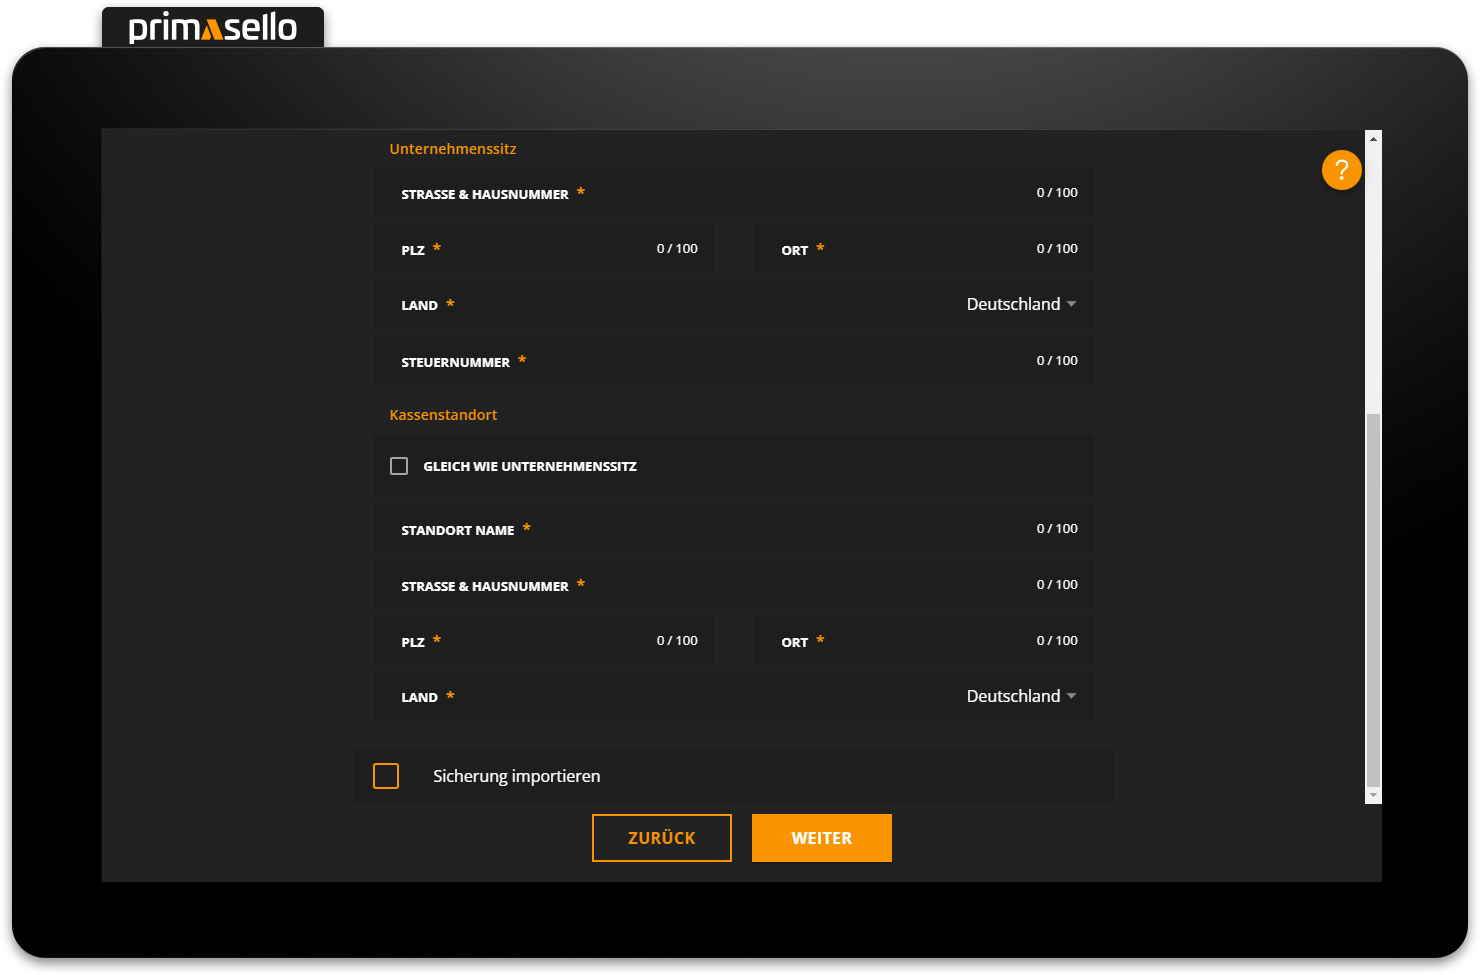
Company data
The next step is to enter the company's details. The company details are stored in the runtime database. The new primasello cash register can be given a name and a number to make it easier to identify within the company (especially if there are several registers). This information is stored or printed on every receipt. The company data entered here is used as default for the receipt template and printed in the header of each receipt. The company data and the receipt template can be changed at any time later.
If the register location differs from the registered company address, new information about the register location can be entered by unchecking the ‘Same as company headquarters’ box.
Press the orange ‘Next’ button at the bottom to proceed to the next step of the commissioning process. You can use the ‘Back’ button at any time to return to previous steps and correct your entries.
Import runtime database
If you want to import an existing backup of the runtime database, select the ‘Import backup’ field at the bottom before clicking ‘Next’ to select a backup of the database. This option is mainly used when replacing devices in order to transfer the existing runtime data from the old primasello register to the new one without losing it, e.g. due to a device defect. Normally, each new register should be created with a new runtime database.
Warning
To ensure that fiscal data is exported correctly from the register, the same runtime database backup cannot be used in multiple registers.
All receipts (individual records) generated during the operating period of the primasello cash register are stored in the runtime database. In addition, data relating to the company itself, such as company and cash register data, as well as master data versioning, are stored.
Company data
How company data can be edited retrospectively is described in the chapter Company Data.
Security module TSE
A technical security device (TSE) is required for a legally compliant cash register. This ensures that all business cases are recorded and cannot be altered retrospectively.
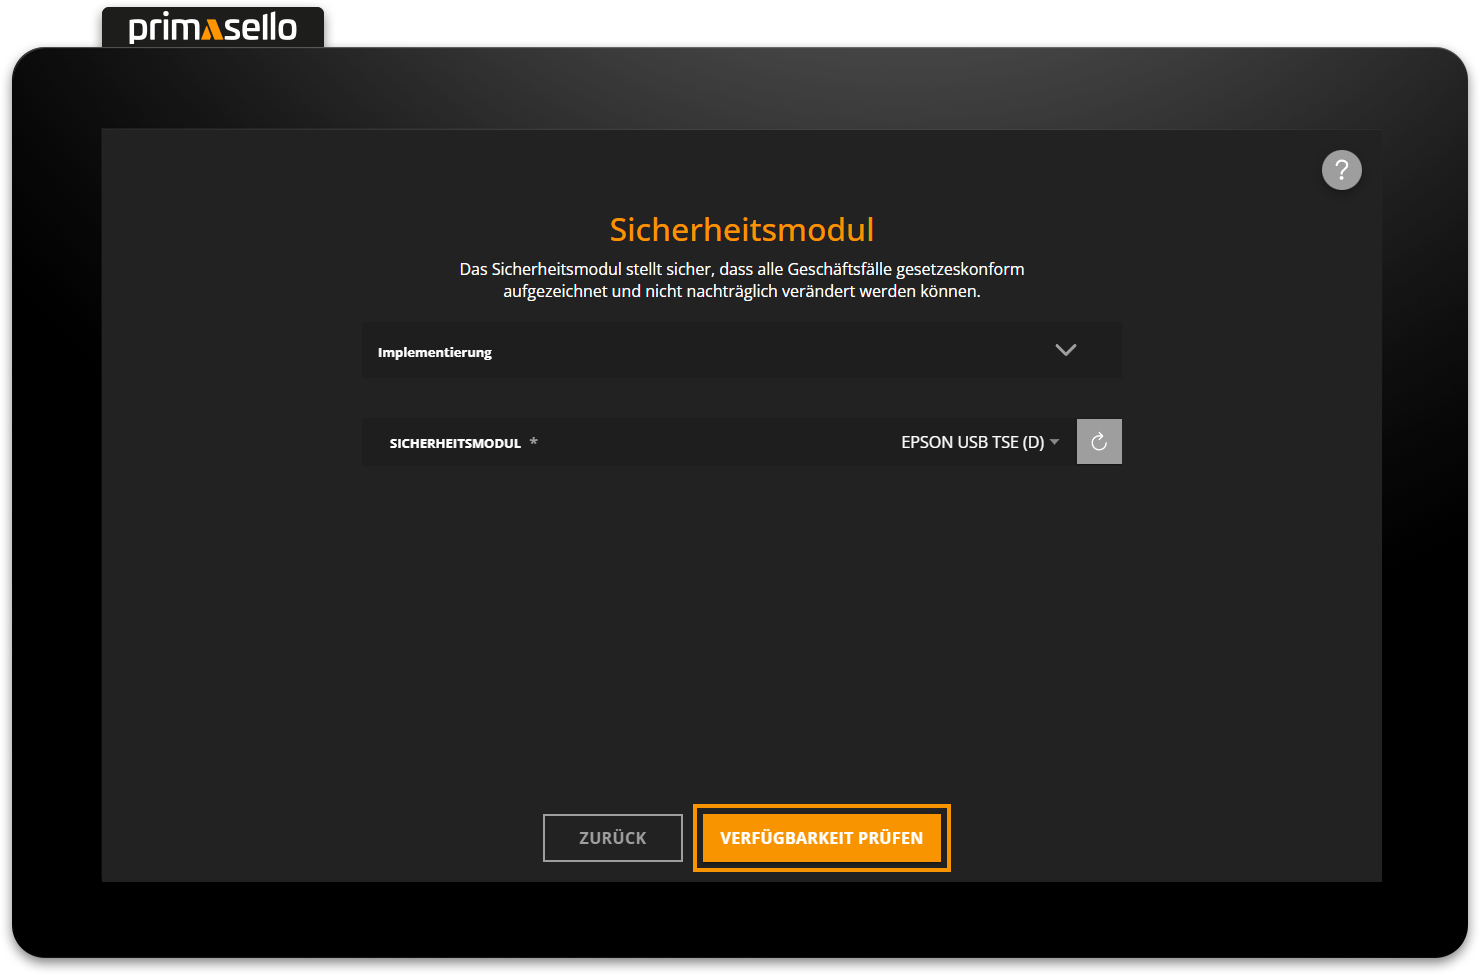
Every primasello cash register is delivered with a USB TSE. This is plugged into one of the USB connectors on the underside of the device and is then ready for use. The name of the connected TSE should appear automatically in the ‘Security module’ selection field. If the TSE is not recognised immediately, the orange ‘Reload’ button next to the selection field can be pressed.
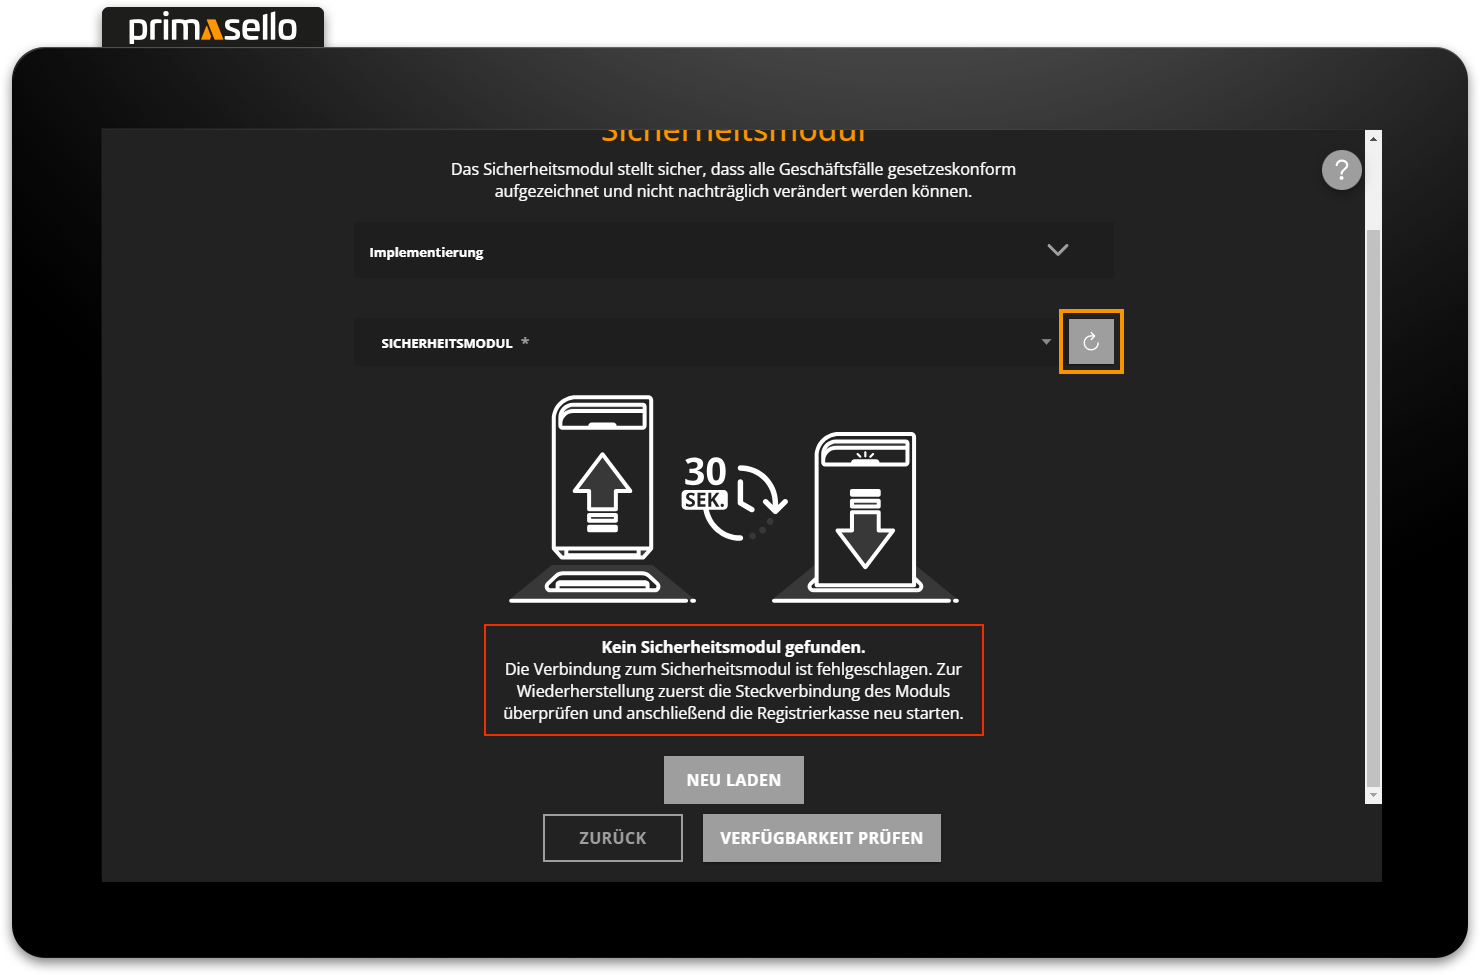
Once the correct TSE has been selected, press the orange ‘Check connection’ button. The TSE will now connect to the primasello cash register. There are two options for the next step, depending on whether the TSE is new (not initialised) or has already been used on another device (initialised).
Not initialised new TSE
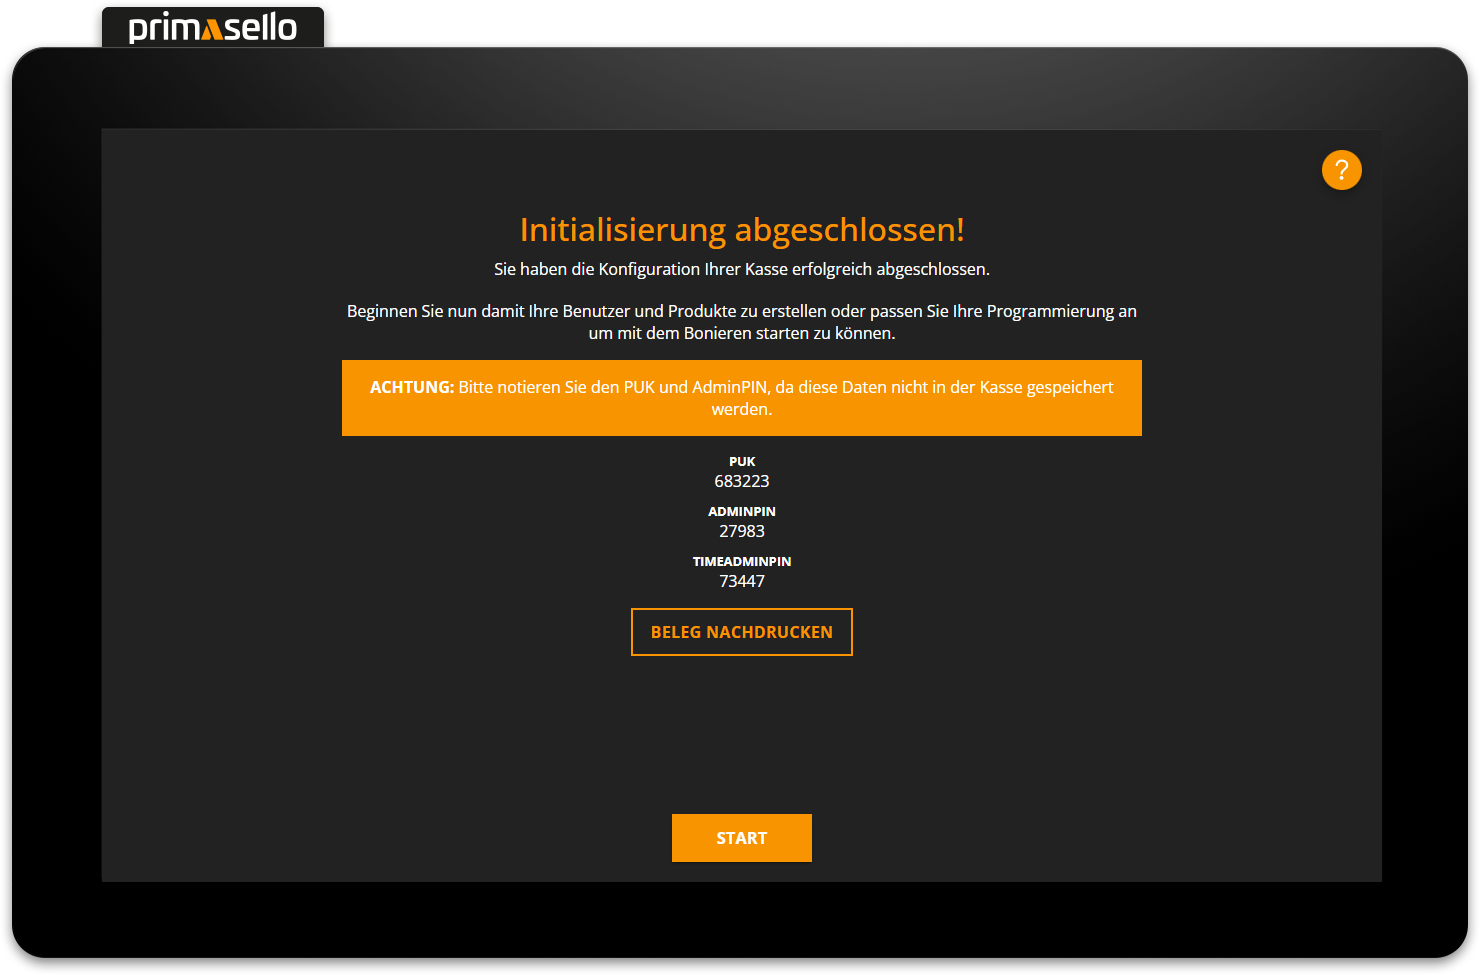
Each TSE is protected against unauthorised access by a TimeAdminPIN and an AdminPIN and has a PUK for resetting and unlocking the PINs. When a new TSE is put into operation, these three PINs are created and stored on the TSE. A new window opens in which the two automatically generated PINs and the automatically generated PUK are displayed.
TimeAdminPIN: The TimeAdminPIN is required for daily operations (creating receipts, setting times) and is stored directly in primasello. This PIN only has to be re-stored when changing the TSE.
AdminPIN: The AdminPIN is required for administrative tasks and data export operations in the TSE. This PIN is not stored in the register and has to be entered by the operator when performing an operation.
PUK: The PUK is used to unlock the TimeAdminPIN and AdminPIN if they have been entered incorrectly too many times and are therefore locked.
Attention
The PUK can be entered incorrectly a maximum of three times, after which the TSE will be blocked and has to be replaced.
It is essential to keep these passwords safe, as access to the TSE (e.g. for tax audits) is not possible without them, and the TSE will be locked and therefore unusable if the password is entered incorrectly three times.
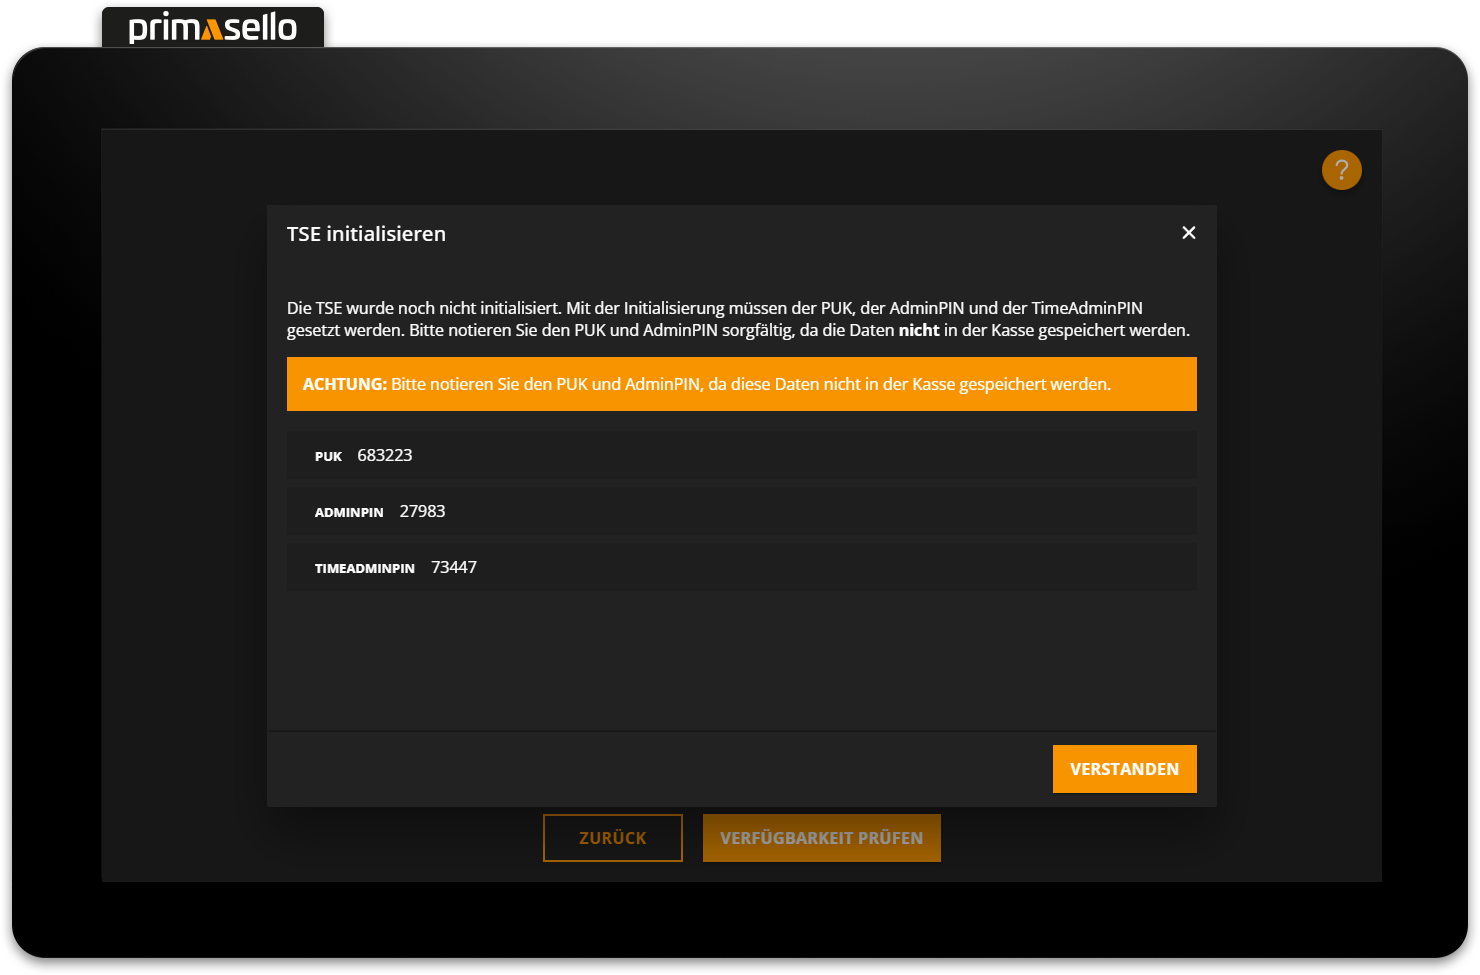
Pressing the orange ‘Understood’ button in the lower right corner of the window closes it and displays a summary of the TSE data below the security module selection field.
Initialised used TSE
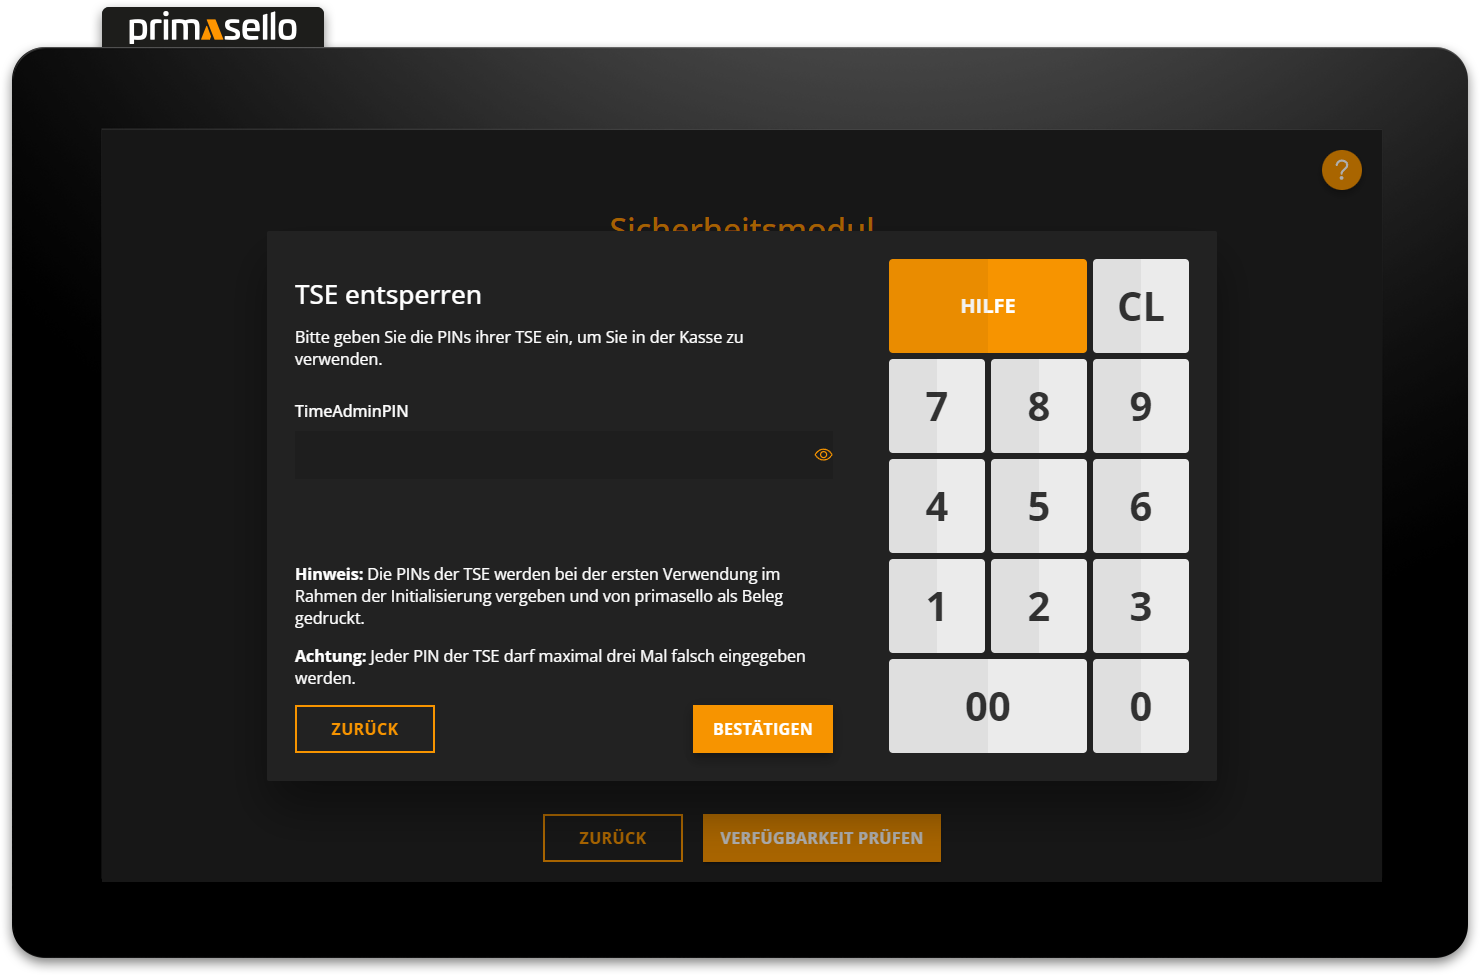
If a TSE is connected to the primasello cash register that has already been initialised on another device, the AdminPIN and TimeAdminPIN of the TSE used are required. A window opens prompting you to enter the AdminPIN. This can be entered using the numeric keyboard on the right-hand side and confirmed with the orange ‘Continue’ button.
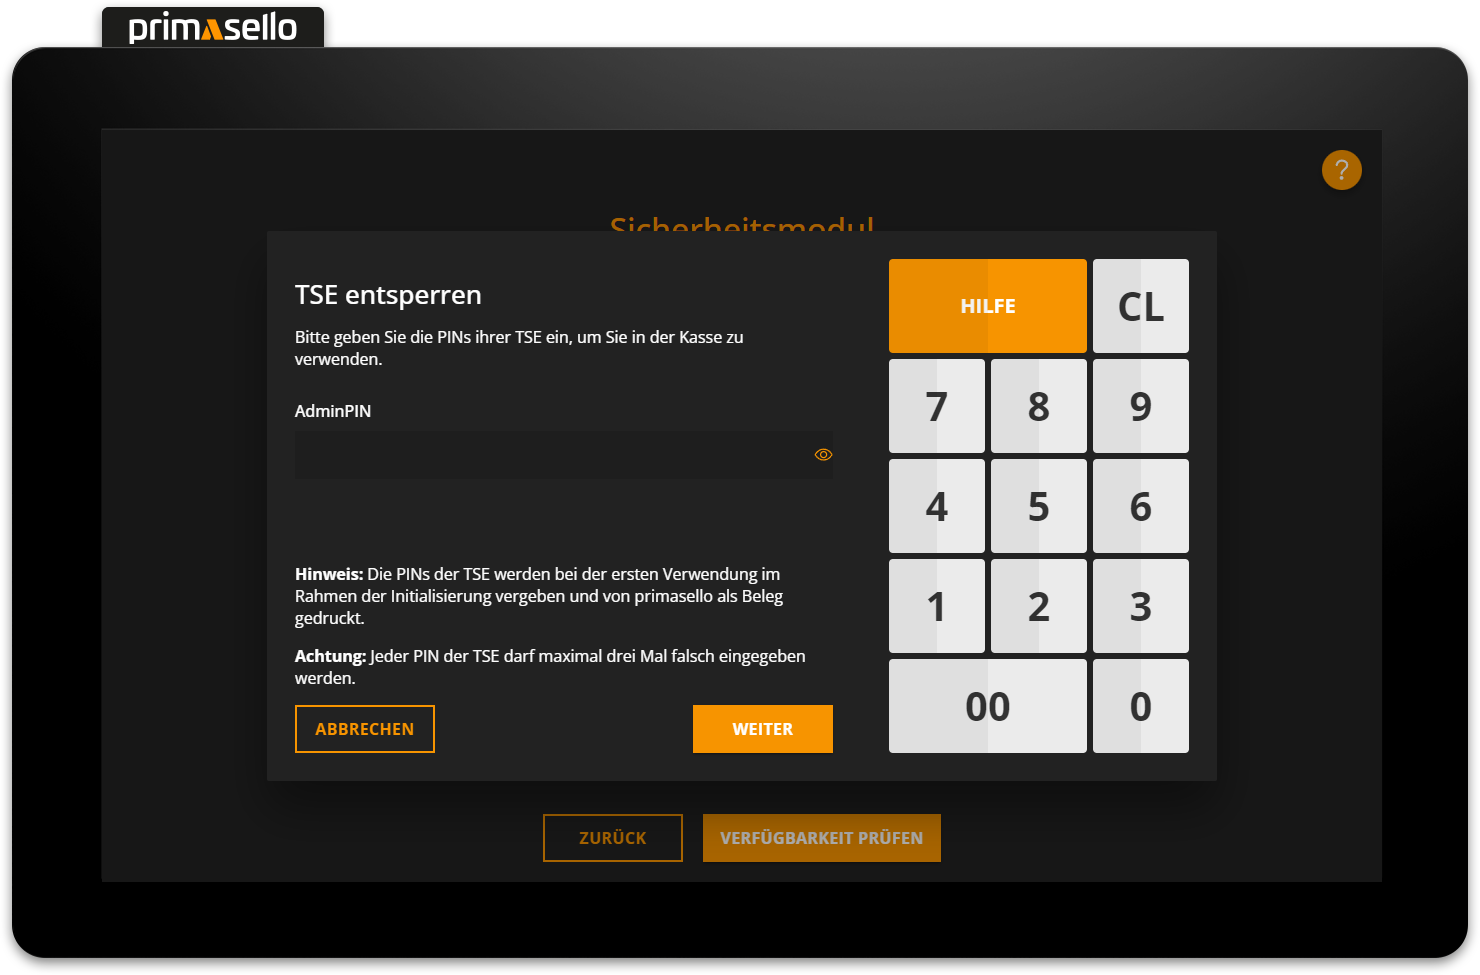
Next, you have to enter the TimeAdminPIN of the connected TSE in a new input field. If both passwords are correct, press the orange ‘Confirm’ button to close the window and connect the TSE to the primasello cash register.
Complete start-up
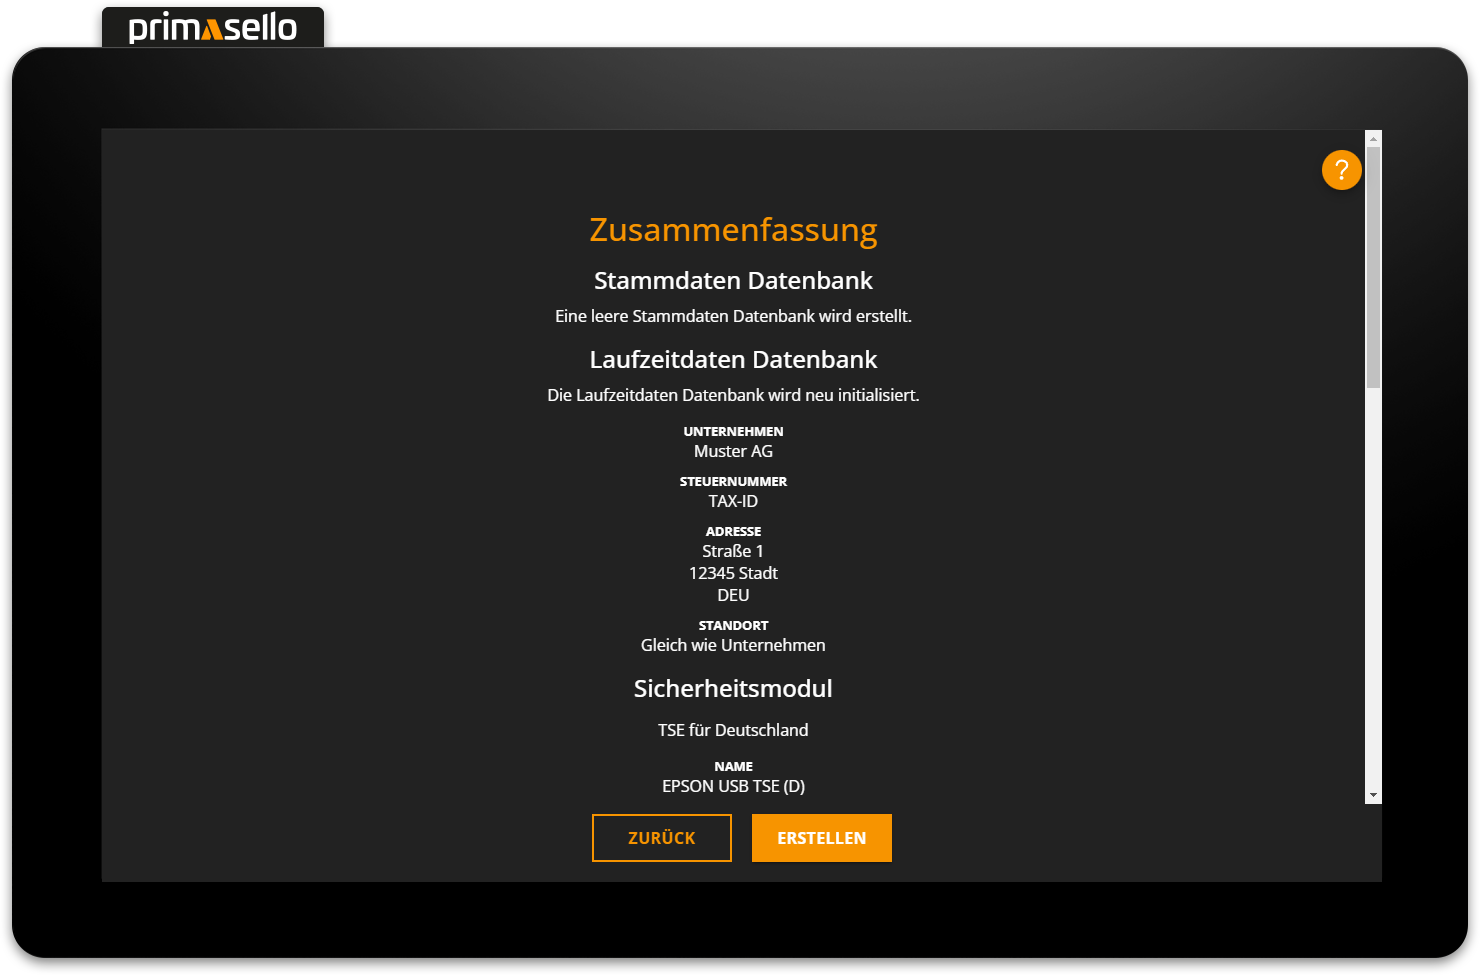
Once the databases have been selected, all data entered and the TSE connected, the setup assistant will take you to an overview page with a summary of all the information you have entered. The data should be checked again before completing the configuration. If any of the information is incorrect, you can use the ‘Back’ button to return to the desired step and correct the information. Otherwise, complete the initialisation by clicking on the orange ‘Create’ button.
If the data is correct, press the orange ‘Create’ button at the bottom to complete the setup. The system saves the information and creates the databases – this may take a few moments, depending on the size of the data. Once the setup is complete, a receipt with the data is printed out, a success message appears, and the register can be started by pressing the orange ‘Start’ button at the bottom. If a receipt with the data is not printed automatically, for example because there is no receipt paper in the printer of your device, you can use the ‘Reprint Data’ button to instruct the device to print the data again.
When the primasello cash register is started, it is in a locked state. The register can be unlocked by logging in a user.
Errors during start-up
If something goes wrong during commissioning, you can find more information on troubleshooting in the chapter Edit Configuration.
Back up databases
Once all settings, programming adjustments and master data changes have been made, it is advisable to create a backup of the databases before using the system for the first time.
All functions should also be checked and at least one receipt should be created for testing purposes. The training user can be used for this purpose.
Registration in ELSTER
After successfully commissioning the register, it must still be registered in ELSTER. The individual steps for doing so are described under Registration in ELSTER.